News
UPCOMING SKYWARN TRAINING NOTICE
NWS Cleveland, in cooperation with Crawford County Office of Emergency Services and the Crawford Amateur Radio Society, will be holding annual SKYWARN training on April 27th , at 6 PM at the West Mead #1 VFD , 10482 Liberty St Ext in Meadville PA. Please pre register at https://www.weather.gov/cle/skywarn_schedule , scroll to the bottom to find the Crawford County session.
![]()
NEW MEETING LOCATION
UPDATE, new meeting location. Starting with the February meeting, Feb 17th, the clubs new meeting location will be the West Mead #1 Fire Hall, located at 10482 Liberty St, Meadville. Please park in the rear, and use the rear door for access. DO NOT BLOCK THE FRONT FIRE DOORS !!!. We would like to thank St Brigids Church for their many years allowing us to meet there. The church has been closed due to the pending sale, and while one door closes, another opens and we look forward to seeing everyone at our new meeting location.
A message from Atlantic Division Director K3RF on the new hand free driving law
Pennsylvania’s new distracted driving law just went into effect. Many
of you have asked me about the law and whether it affects ham radio
operations. An interactive mobile device was broadly defined in the new
law. The law now adds to the existing prohibition on texting while
driving. Use of a cell phone or other device being held in your hand is
generally prohibited. As presented, it included hand-held microphones
and hand-held transceivers. All uses which are hands free are generally
excepted, but few mobile radios have a hands-free option, at least not
yet.
So is there an exemption for hams? Yes, after quite a struggle.
Though negotiated over some time a few years ago – I was present during
two teleconferencing meetings with the sponsoring elected officials –
our exemption got striped out of the bill at the last minute years later
and then passed the PA legislature. I only heard about the last minute
change due to the diligence of a ham who follows new bills being
introduced. Our League should be monitoring such laws for you, did for
years, and then stopped a few years ago.
We had two weeks or so to try and add back a reasonable exemption I had
helped mold a few years before. After sending out a message here for
help, many PA radio clubs stepped up and used our circulated talking
points why our use of radio was different that the causal use of
consumer devices by the general public. I demonstrated this in a video
production sent to legislators a few years ago.
We also saw an opportunity to partner with our volunteer emergency
responders who use radio in their personal cars in responding to
emergencies with public safety band radios. That use too was not
exempt! To my surprise, many of our legislators in PA did not realize
volunteer firefighters, EMS and other such trained members of the public
are not stationed at nor responding from a fire station or similar
facility for a 911 call. Rather, we report in on our radios as we
respond.
PA Representatives needed to be educated that the exemption they
provided for emergency vehicles (special plates for EMS and fire trucks)
did not cover us. To their credit they appreciated the problem after
discussions. I drafted the language for both hams and emergency
response volunteers you see now. Many of you made phone calls and sent
letters to your representatives. It worked.
The PA Senate voted on the updated bill and the PA House then voted to
accept the changes. You should note that other radio services, GMRS and
CB (if not a commercial driver) for example, are not exempted. That was
not our fight and may have been a bridge too far for our efforts.
Excerpts of the exemptions mentioned above are:
(4) a mobile or handheld radio being used by a person
with an amateur radio station license issued by the fed eral
communications commission; . . .
(6) a device being used exclusively by an emergency
service responder while engaged in the performance of duties; . . .
There are other exemptions but they involve GPS use and commercial
vehicle drivers (think UPS and such using tablets for deliveries). The
bottom line is that we have a limited exemption to use radio while
mobile, but let’s not be lulled into a sense of security. You are
still responsible for safe operations regardless. Your use of a radio
while driving can still be an element of liability if you are involved
in an accident caused by your distracted driving. Let’s show the
public how it should be done. Let’s be the good guys and gals whether
operating while driving or not. And I recommend you always carry a copy
of your FCC license in the glove box. Keep it with your registration
and such. It is easy enough to print out an official copy from your
file with the FC C. If an officer does not know about the exemption, DO
NOT start an argument. Deal with any exemption in court.
And I have already received a call asking if you are using an Echolink
or similar remote type operation on your phone while driving, are you
covered? Well, this illustrates why they invented lawyers and how words
have meaning. While I attempted to offer broader language, it was
rejected so that no loophole would exist for hams to use handheld phones
generally – use your Bluetooth hands free for the cellphone device.
A prosecutor of an issued ticket would argue that the phone used for
remote access is not a radio nor meant to be included. A defense lawyer
would argue it is of course a radio (wireless) and it was in use with
your amateur privileges (see the exemption – …being used by a person
with an amateur radio station license issued by the federal
communications commission). So, do so at your own risk if you do not
have a PTT accessory device allowing the cellphone to stay in a holder
and be used as a mobile radio. Let’s not push this. Welcome to my
world as a practicing lawyer. But in the end, we dodged the proverbial
bullet. Mobile on, but let’s keep our eyes on the road.
73, and I will see you on the radio . . .
Bob Famiglio, K3RF
ARRL Atlantic Division Director
Chairman Legal Defense Committee
Chairman ARES Subcommittee
610-359-7300
![]()
PA Hands Free driving law now in effect.
FCC CORES Registration
If you have not yet registered with the new FCC CORES system, you will need to do so before you attempt to renew your license, this link will provide instructions on how to register : http://www.arrl.org/fcc-cores-registration-instructions
2022- The year in review.
As presented at the January 2023 monthly meeting of the Crawford Amateur Radio Society, a great presentation by Barry WA3GSH.
CARS 2022 Year in Review-website versionHow to get WSJT-X, JTAlert and N1MM Logger+ all working together
How to get WSJT-X, JTAlert and N1MM Logger+ all working together
Compiled by Todd, N3PKJ
This will be a step by step instructional on how to WSJT-X, JTAlert and N1MM Logger+ all working together, not using the Digital Interface within N1MM Logger+. I will assume that at least you have WSJT-X alone working correctly with your radio, having CAT Control plus audio to and from WSJT-X. If you need help with setting up WSJT-X please refer to WSJT-X 2.1 User Guide. So now let’s get started. We start with some important things in WSJT-X.
In WSJT-X.
1. Go to file…..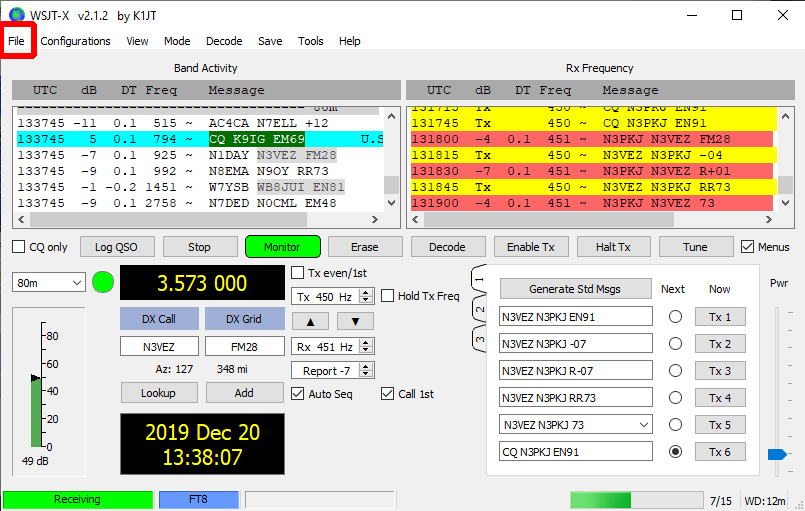
2. Then to Settings…..
3. Then to the Reporting Tab…..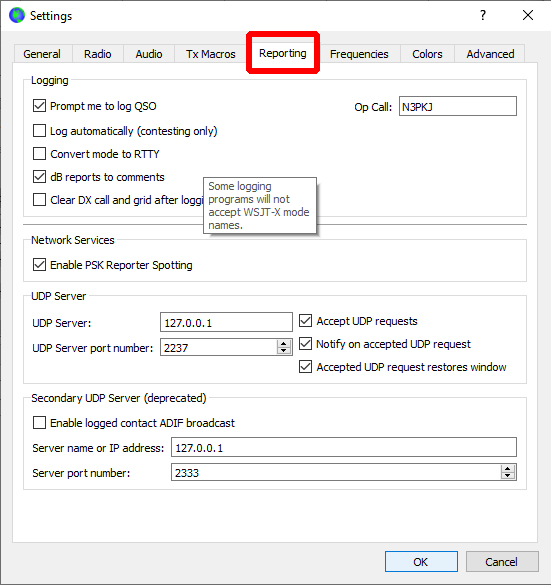
4. Next in the UDP Server section…..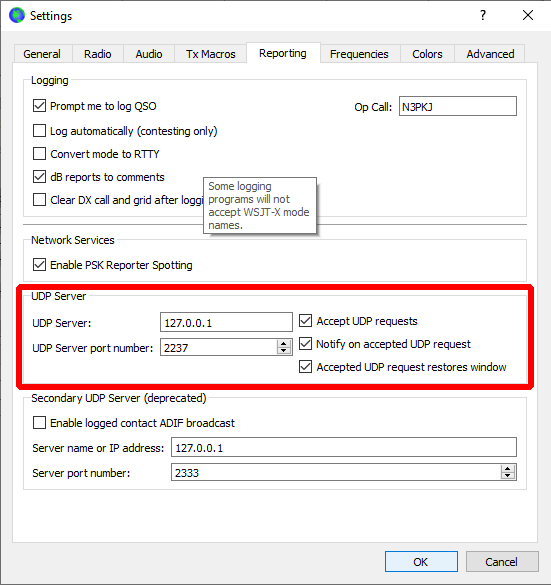
5. Make sure the 3 checkboxes on the far right are checked. A. Accept UDP requests B. Notify on accepted UDP request C. Accepted UDP request restores window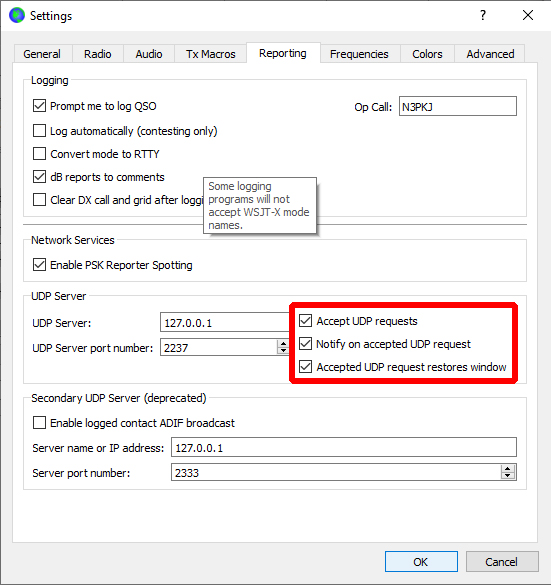
6. Next in the Secondary UDP Server (deprecated) section…..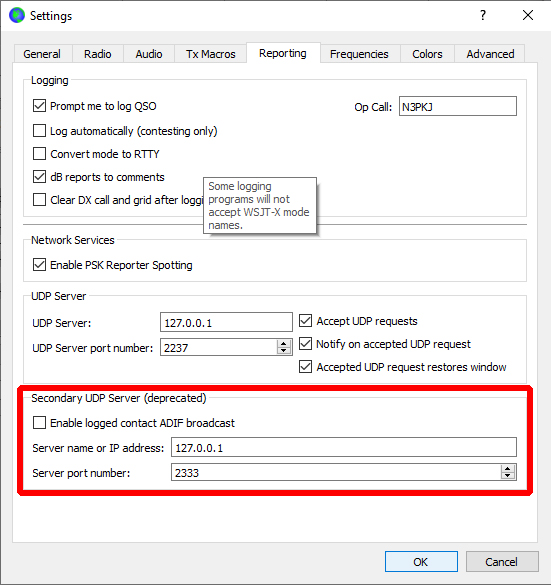
7. Make sure Enable logged contact ADIF Broadcast is unchecked. (deprecated) section…..
8. Now let’s look at JTAlert.
9. Go to Settings…..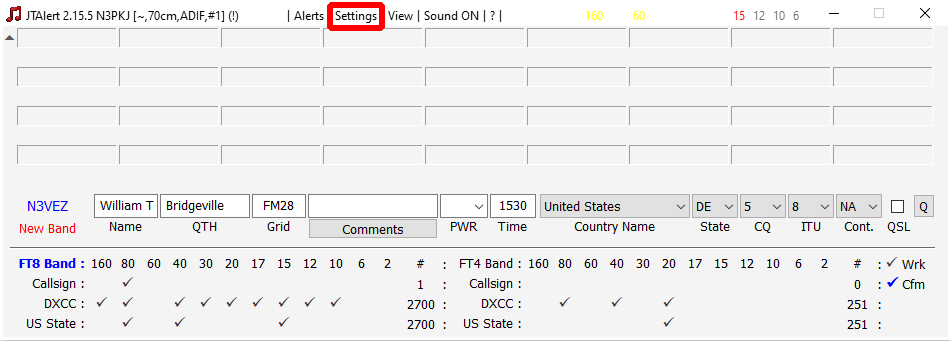
10. Then to Manage Settings…..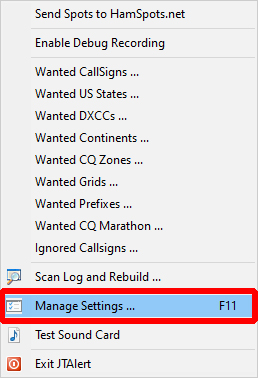
11. Then to Logging……
12. Then to Last QSO API……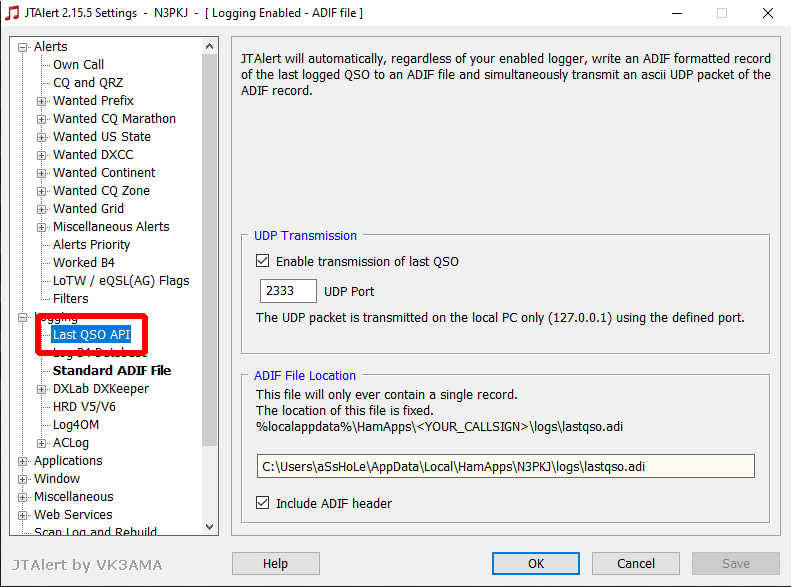
13. Then in the UDP Transmission section……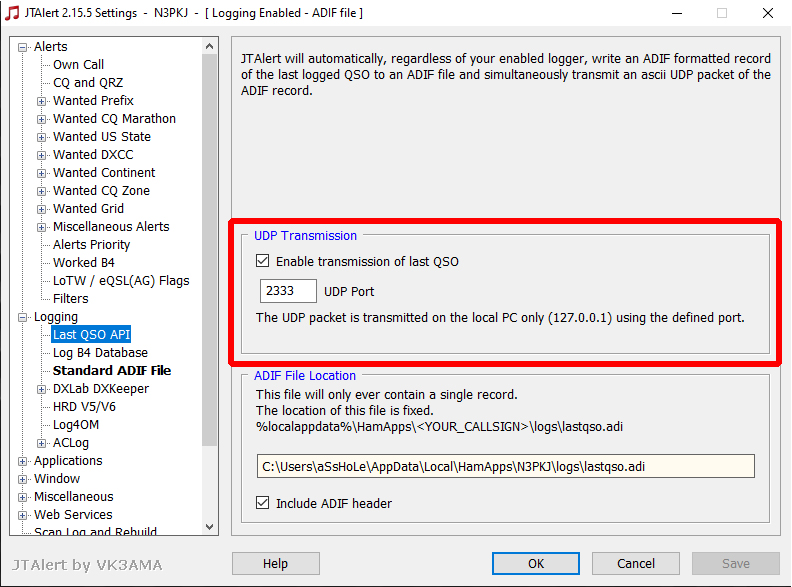
14. Check the box Enable transmission of last QSO…..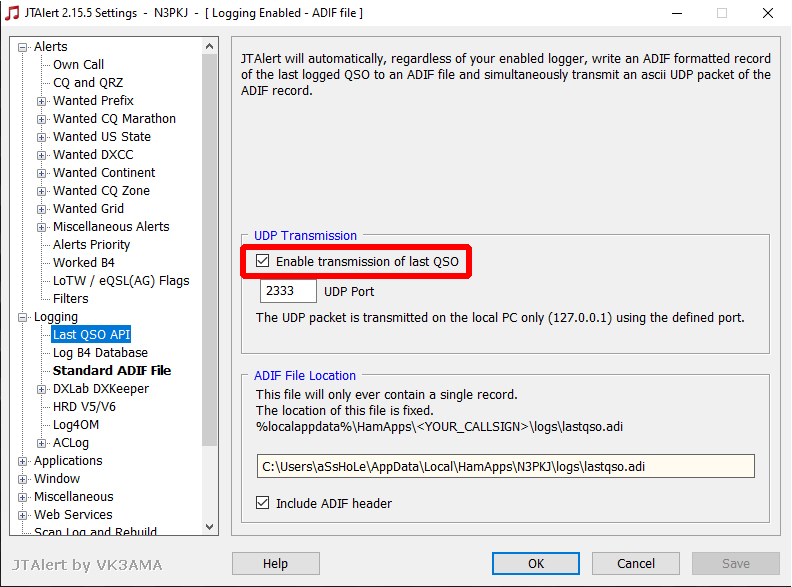
15. Then in the UDP port box…..
16. Next go back to the list on the left and go to Applications…..
17. Then to WSJT-X / JTDX…..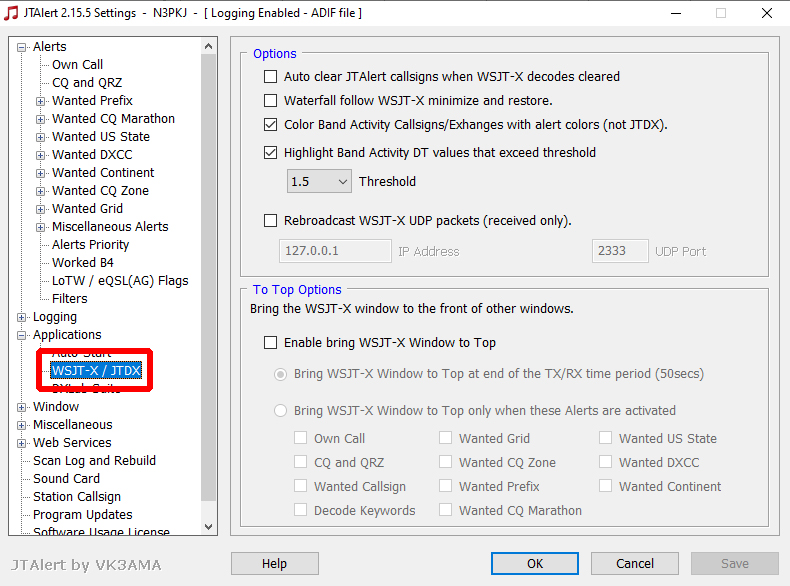
18. Now in the Options section……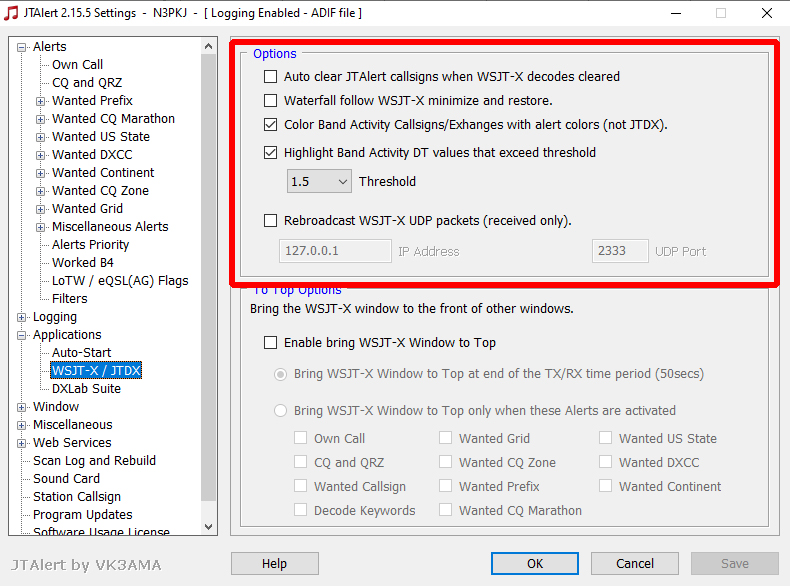
19. Make sure the Rebroadcast WSJT-X UDP Packets (received only) box is unchecked…..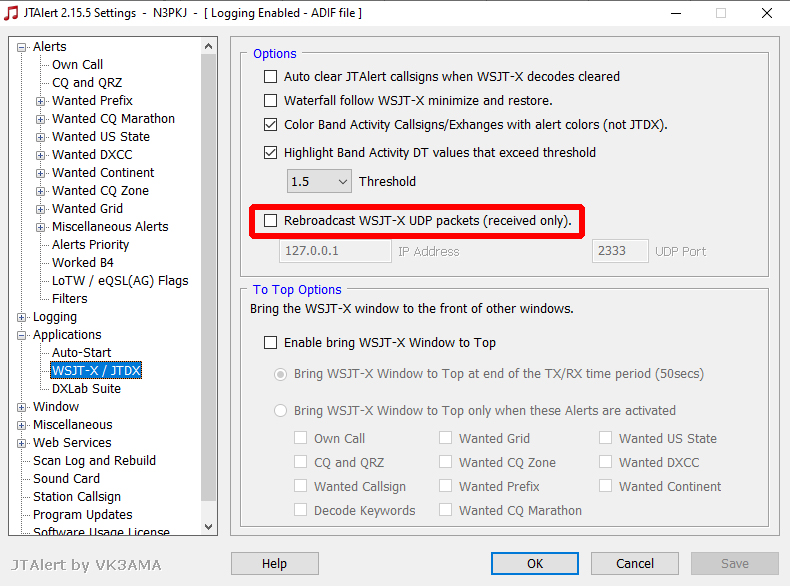
20. Now let’s look at N1MM Logger+. This part gets a bit tricky, but I will walk you through it. I will assume that you have N1MM Logger+ configured for CAT control to your radio. We have a few maintenance things we need to take care first at this point, make sure N1MM Logger+ is not running. For this part you should familiarize yourself with the Multiple INI Files section in the N1MM Logger+ Docs located at https://n1mmwp.hamdocs.com/setup/software-setup/#multiple-ini-files. You need to navigate to C:\Users\<your username>\Documents\N1MM Logger+\ (Replace “<your username>” with your username for Windows.). Mine happens to be C:\Users\*******\Documents\N1MM Logger+\. You can find this folder in your Documents also.
The N1MM Logger+ Folder…..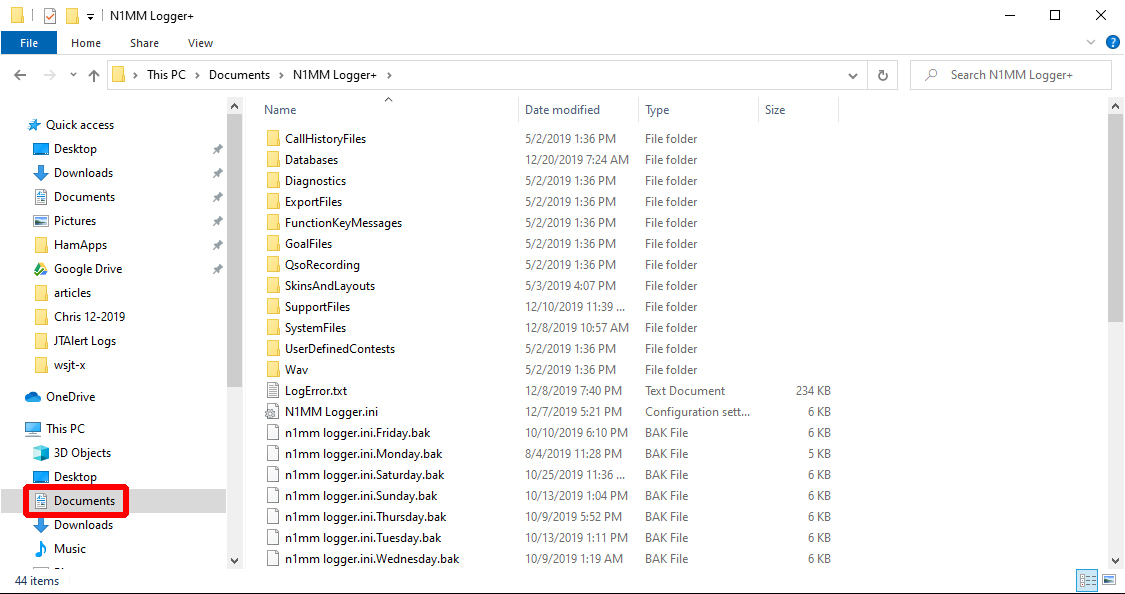
21. Locate the “N1MM Logger.ini” file.
The N1MM Logger.ini file…..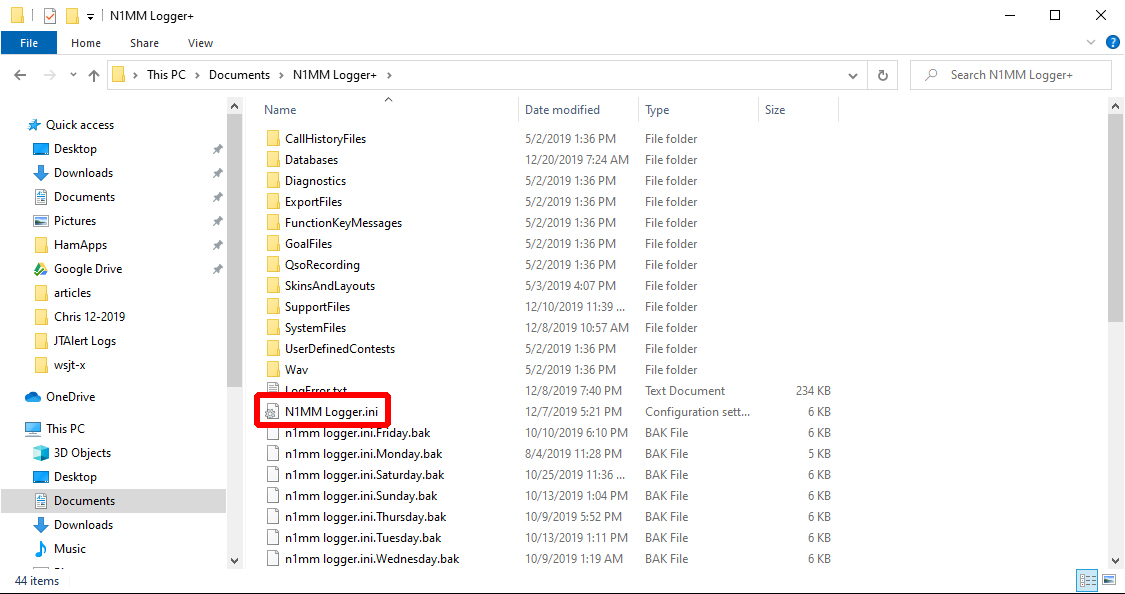
22. Then make a copy of it. To do so click on the file to highlight it.
Highlighted N1MM Logger.ini file…..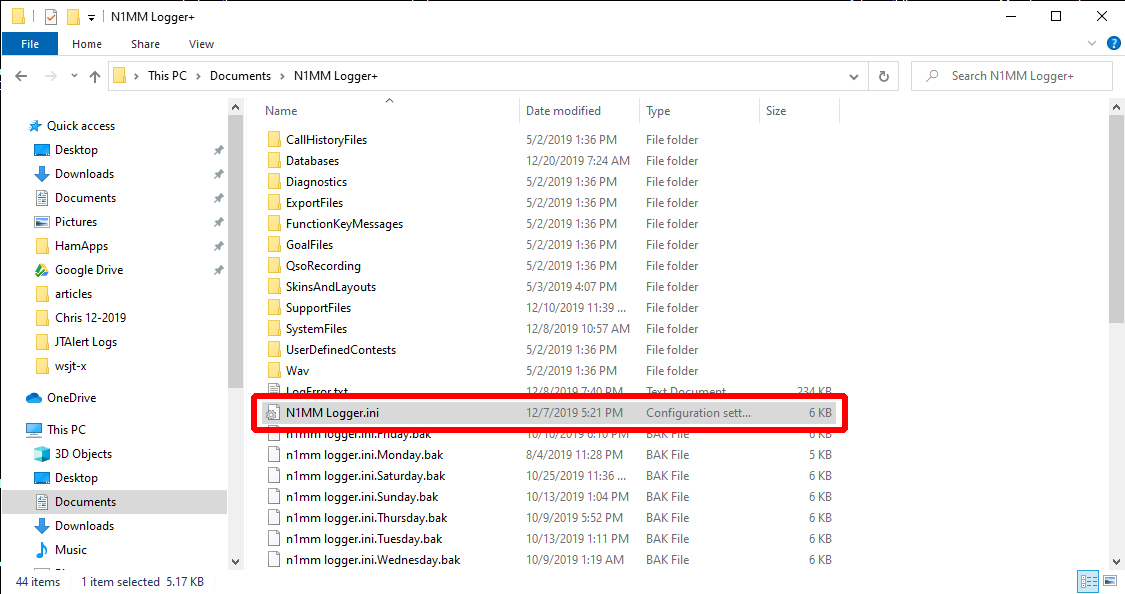
23. Next press and hold the control key and single left click on the file dragging it anywhere in the Windows Explorer window. You should then have a file called “N1MM Logger – Copy.ini”.
The “N1MM Logger – Copy.ini” file….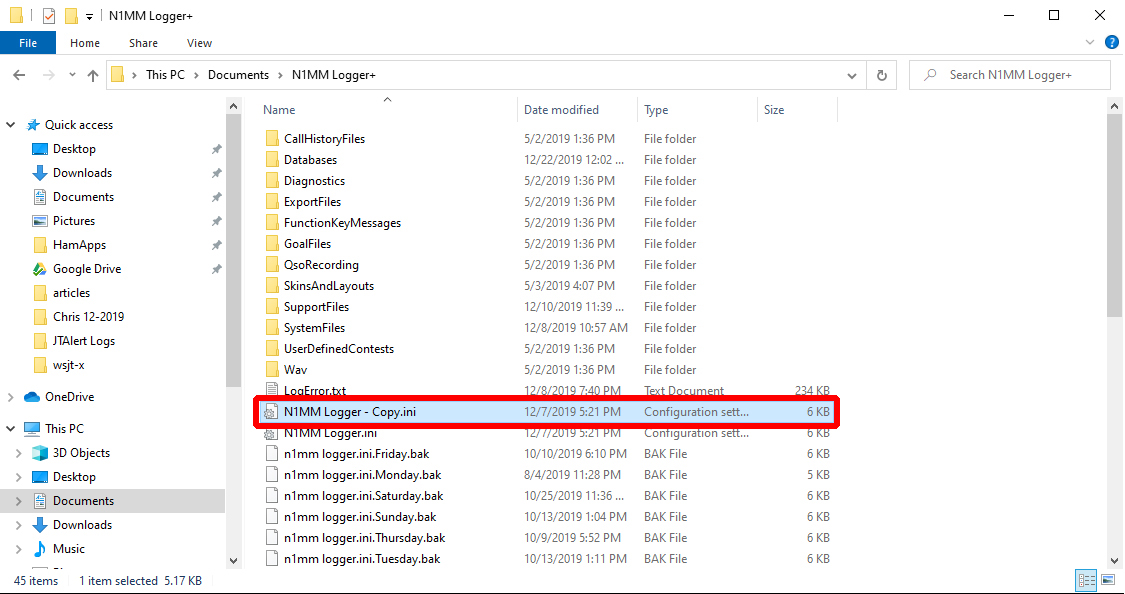
24. Next we will rename this file for use with your radio. Single right click on the “N1MM Logger – Copy.ini” file and select rename.
Rename.
….
Next “N1MM Logger – Copy” should be highlighted (Figure 1). Hit the right arrow key and then backspace the word “Copy”, replacing it with “Radio”. (Figure 2). This will be the INI file we’ll use for logging without the use of WSJT-X or any other third party programs, such as MMTTY or Fldigi. (I suggest making separate INIs for each if you use either.)
Figure 1.
…..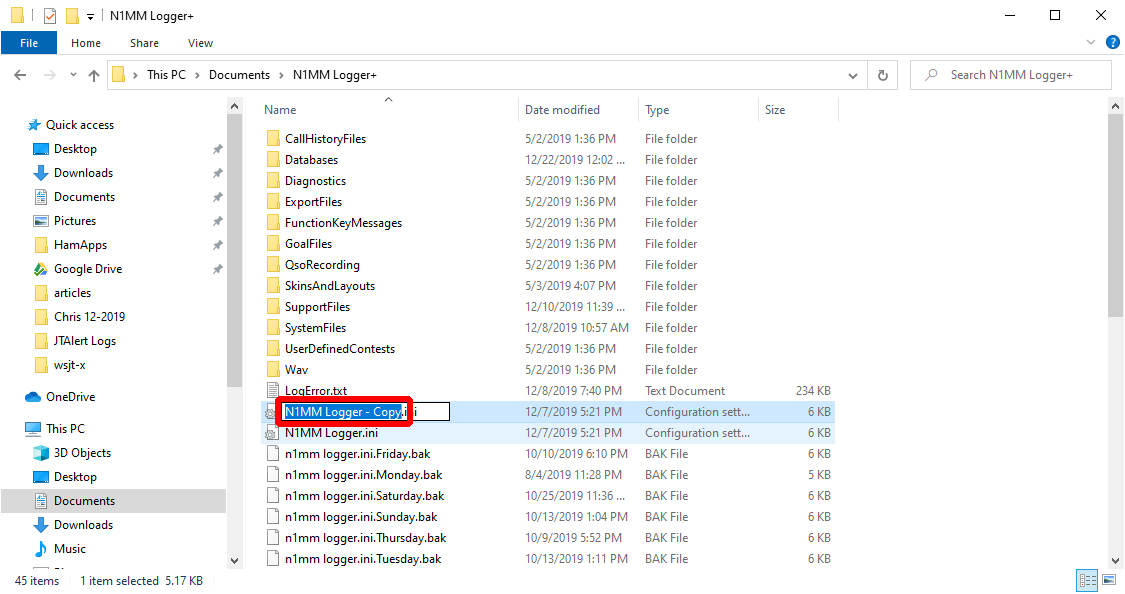
Figure 2…..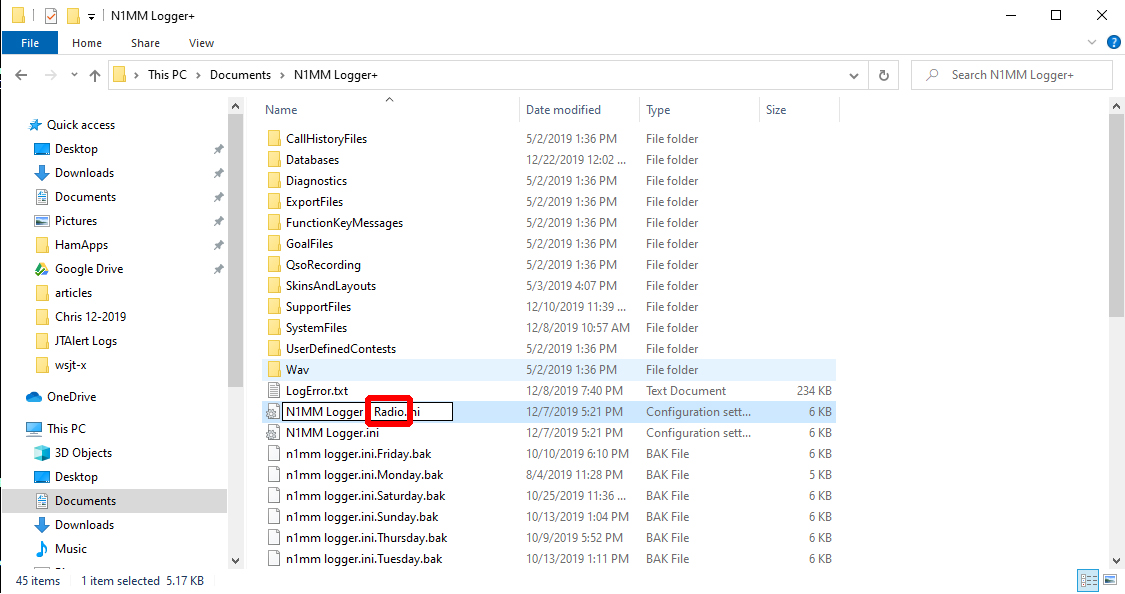
25. Now we need to make second INI file to be used with WSJT-X.
26. Locate the “N1MM Logger.ini” file again.
The N1MM Logger.ini file…….
27. Then make a copy of it. To do so click on the file to highlight it.
Highlighted N1MM Logger.ini file.
28. Next press and hold the control key and single left click on the file dragging it anywhere in the Windows Explorer window. You should then have a file called “N1MM Logger – Copy.ini”.
The “N1MM Logger – Copy.ini” file.
29. Next we will rename this file for use with WSJT-X. Single right click on the “N1MM Logger – Copy.ini” file and select rename.
Rename……
Next “N1MM Logger – Copy” should be highlighted (Figure 3). Hit the right arrow key and then backspace the word “Copy”, replacing it with “WSJT-X”. (Figure 3). This INI file will be used with WSJT-X.
Figure 3.
Figure 4.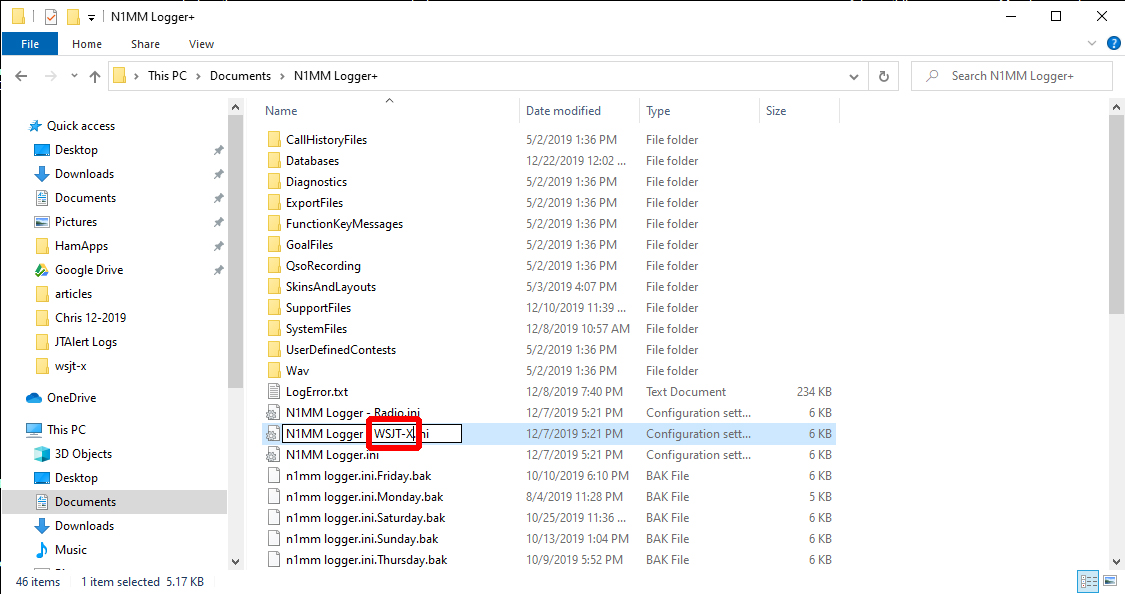
30. Now I will assume that you have a N1MM Logger+ shortcut on your desktop. We will need to make a copy of this too. That will start up N1MM Logger+ using these separate INI files we created. Making a copy of this shortcut is that same process we did for the two INI files we created. Locate this shortcut on your desktop.
N1MM Logger+ shortcut……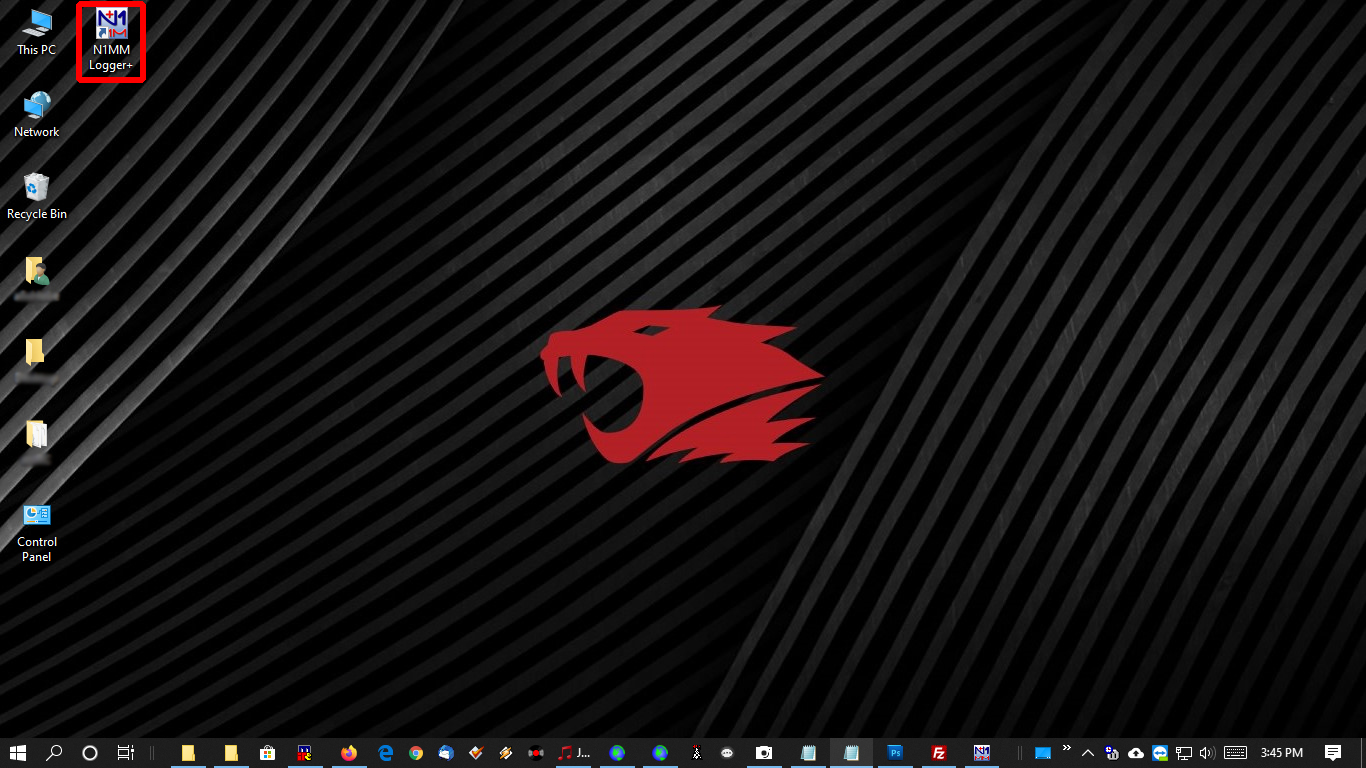
31. Single left click on the N1MM Logger+ shortcut to highlight. Next single left click on it then drag underneath the already existing shortcut.
“N1MM Logger+ shortcut Copy”.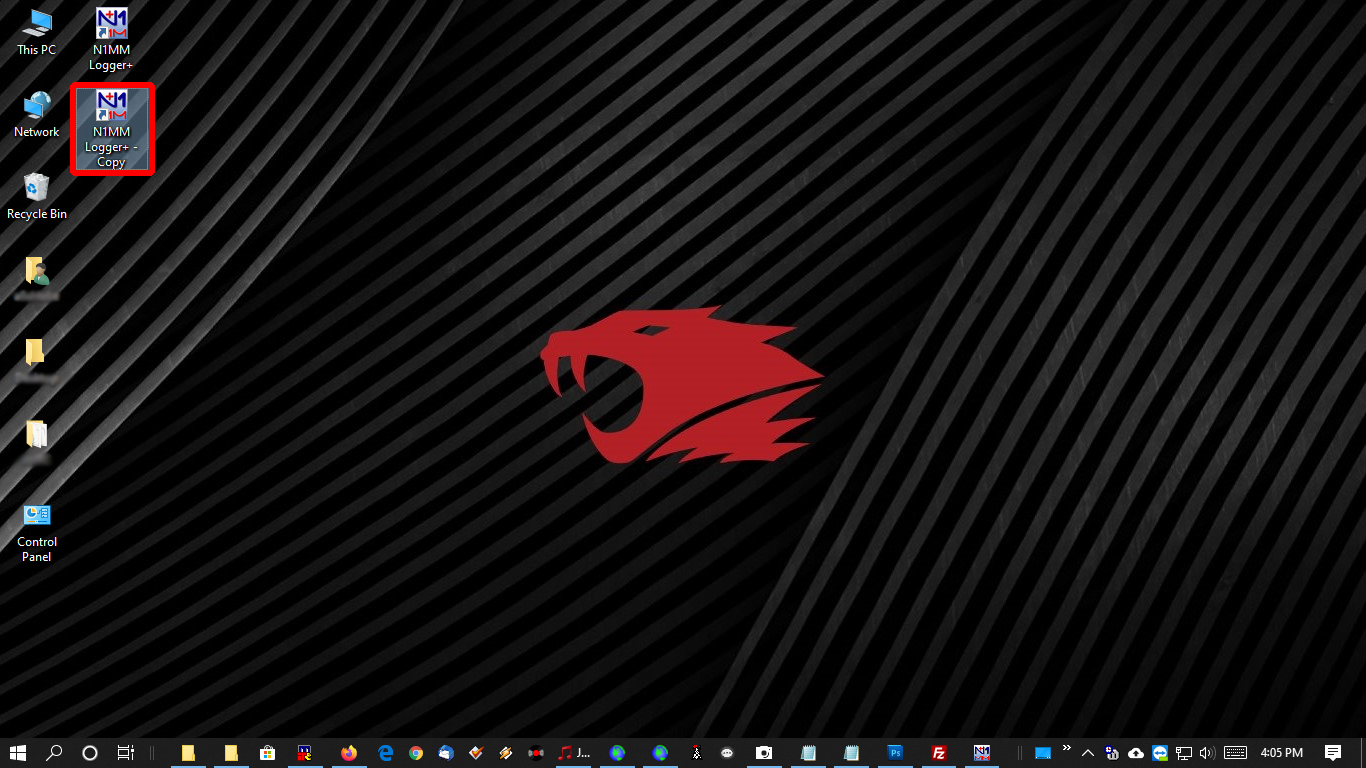
32. Now we need to rename this “N1MM Logger+ shortcut Copy” shortcut. Next single right click on this “N1MM Logger+ shortcut Copy” shortcut and then select rename.
Rename.
33. Next “N1MM Logger – Copy” should be highlighted. Hit the right arrow key and then backspace the word “Copy”, replacing it with “WSJT-X”.
Rename.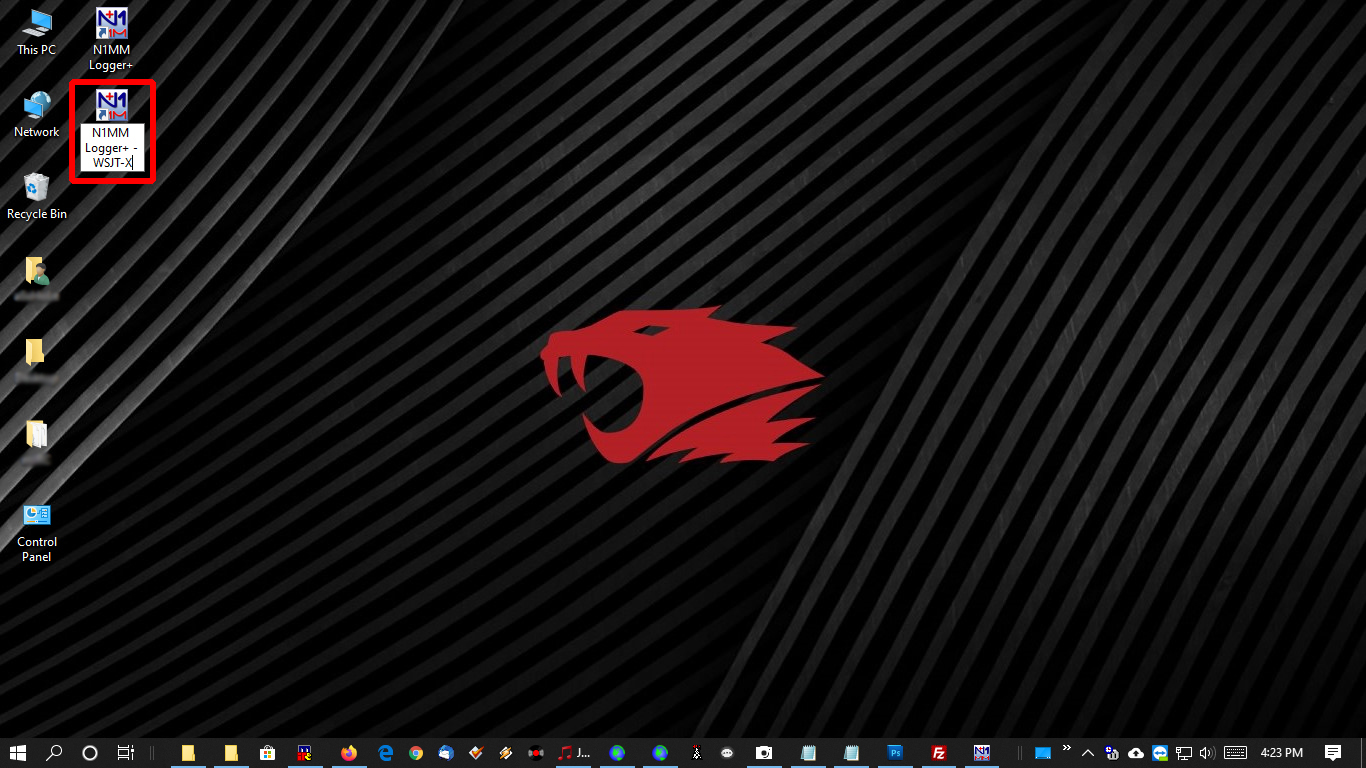
34. Now let’s rename the original shortcut that will be used with the radio. Using the same process as above but adding “- Radio” to it.
adding “- Radio”.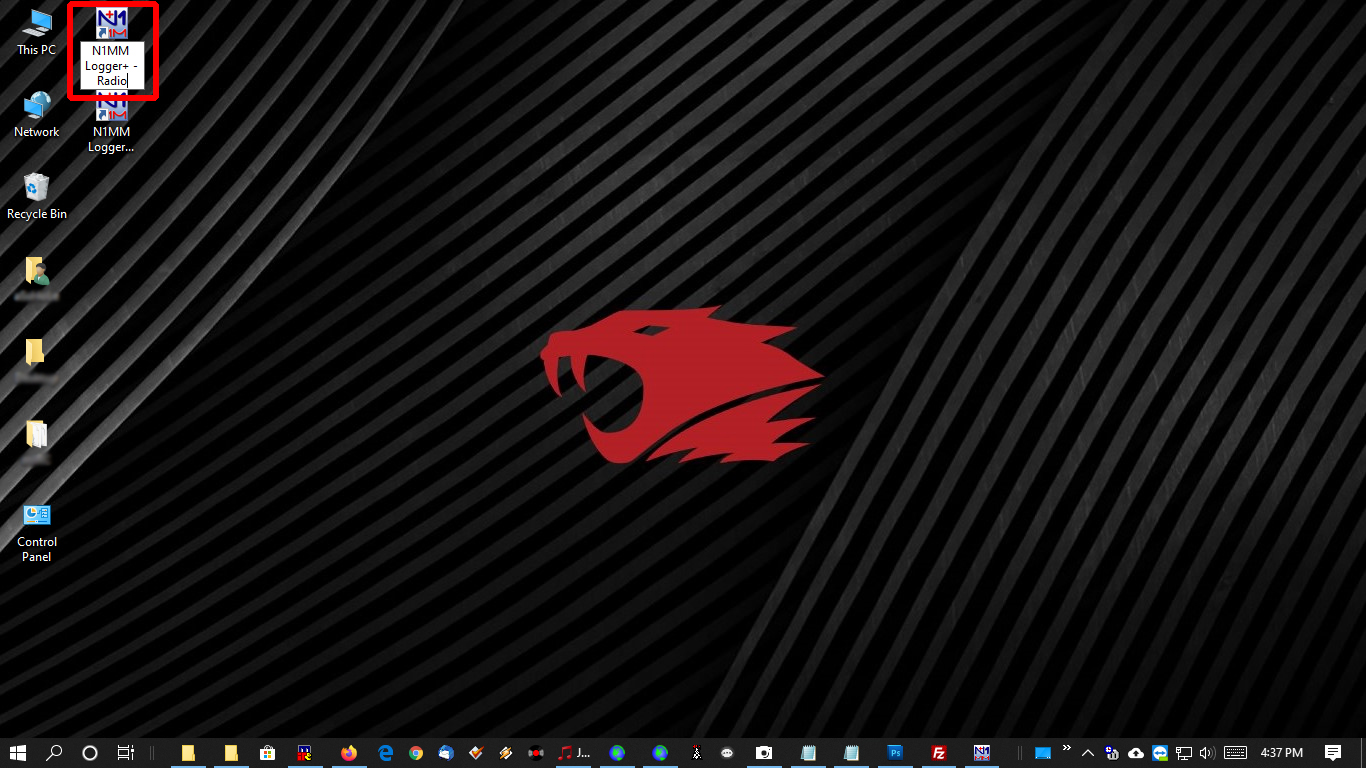
35. Now we need to point both of these shortcuts to the correct INI files.
36. First locate the shortcut we labeled “N1MM Logger+ – Radio” then right click on it. Select properties.
Select properties.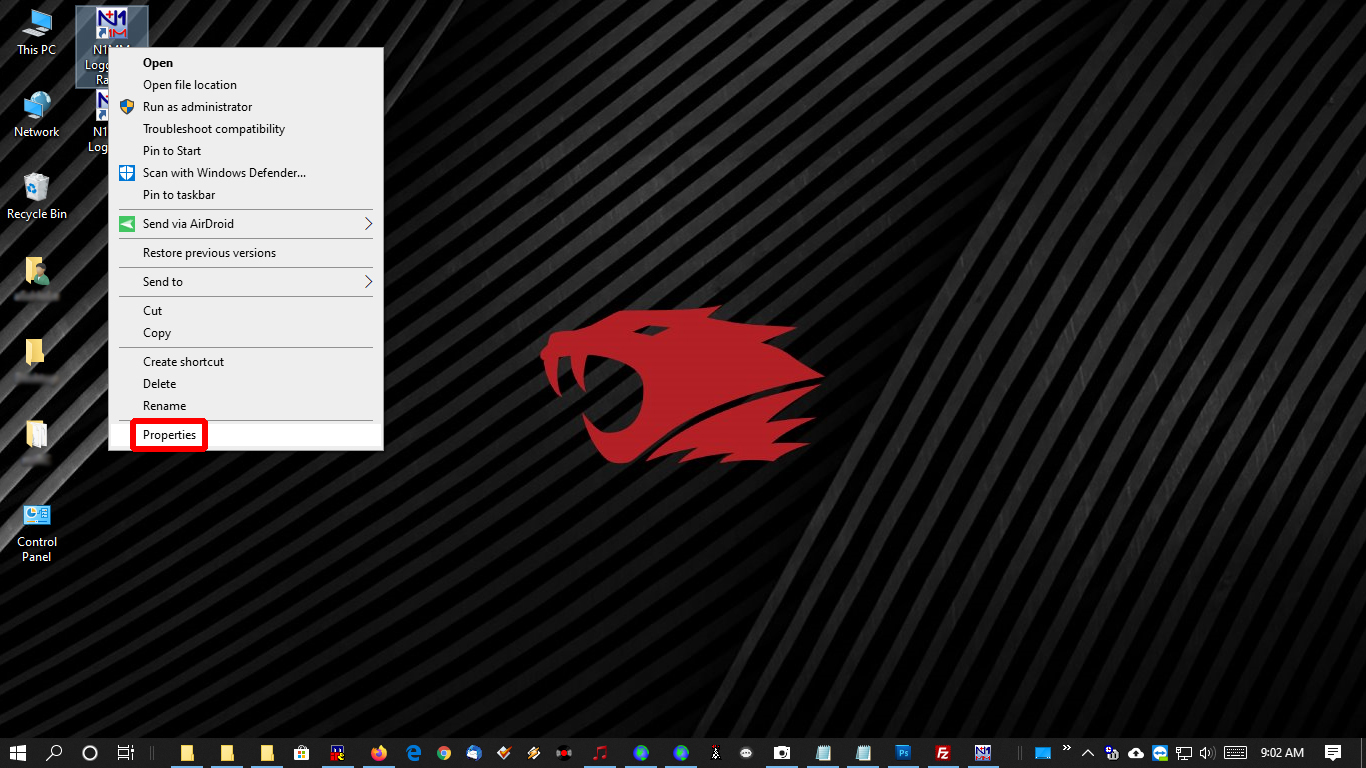
37. Now in the “N1MM Logger+ – Radio” properties window we need to change the target box to read “C:\Program Files (x86)\N1MM Logger+\N1MMLogger.net.exe” Ini=”C:\Users\*******\Documents\N1MM Logger+\N1MM Logger – Radio.ini” (with the quotation marks as shown). Adding Ini=”C:\Users\*******\Documents\N1MM Logger+\N1MM Logger – Radio.ini” to this line, making sure there is a space after “C:\Program Files (x86)\N1MM Logger+\N1MMLogger.net.exe”. Make sure you put your username for Windows here, replacing *******.
Select properties.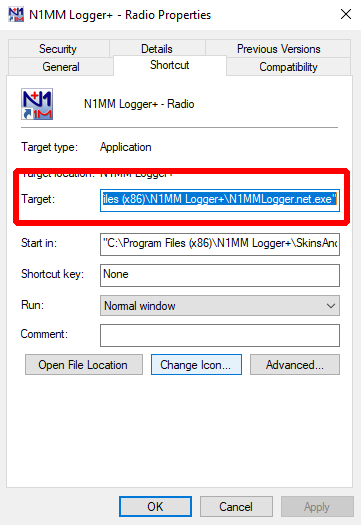
38. Next we need to do the same with the “N1MM Logger+ – WSJT-X” shortcut. In the “N1MM Logger+ – WSJT-X” properties window we need to change the target box to read “C:\Program Files (x86)\N1MM Logger+\N1MMLogger.net.exe” Ini=”C:\Users\*******\Documents\N1MM Logger+\N1MM Logger – WSJT-X.ini” (with the quotation marks as shown). Adding Ini=”C:\Users\*******\Documents\N1MM Logger+\N1MM Logger – WSJT-X.ini” to this line, making sure there is a space after “C:\Program Files (x86)\N1MM Logger+\N1MMLogger.net.exe”. Make sure you put your username for Windows here, replacing *******.
Select properties.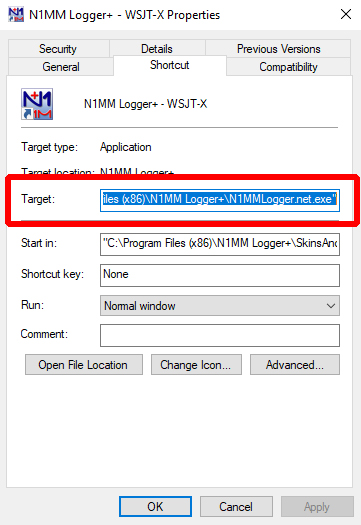
39. Finally we are done with these maintenance operations we needed to get done. So now we will start to configure N1MM Logger+ for use with WSJT-X.
40. Now start N1MM Logger+ use the “N1MM Logger+ – WSJT-X” shortcut we made. Once N1MM Logger+ opens, go to config.
Config.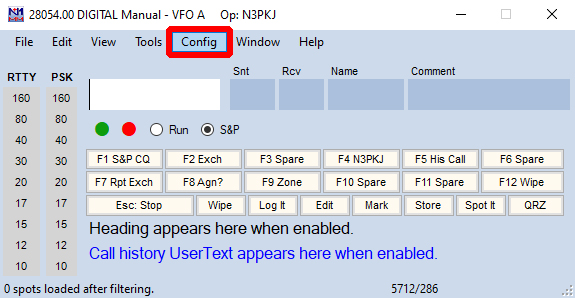
41. Then select “Configure Port, Mode Control, Winkey, etc…”
Config.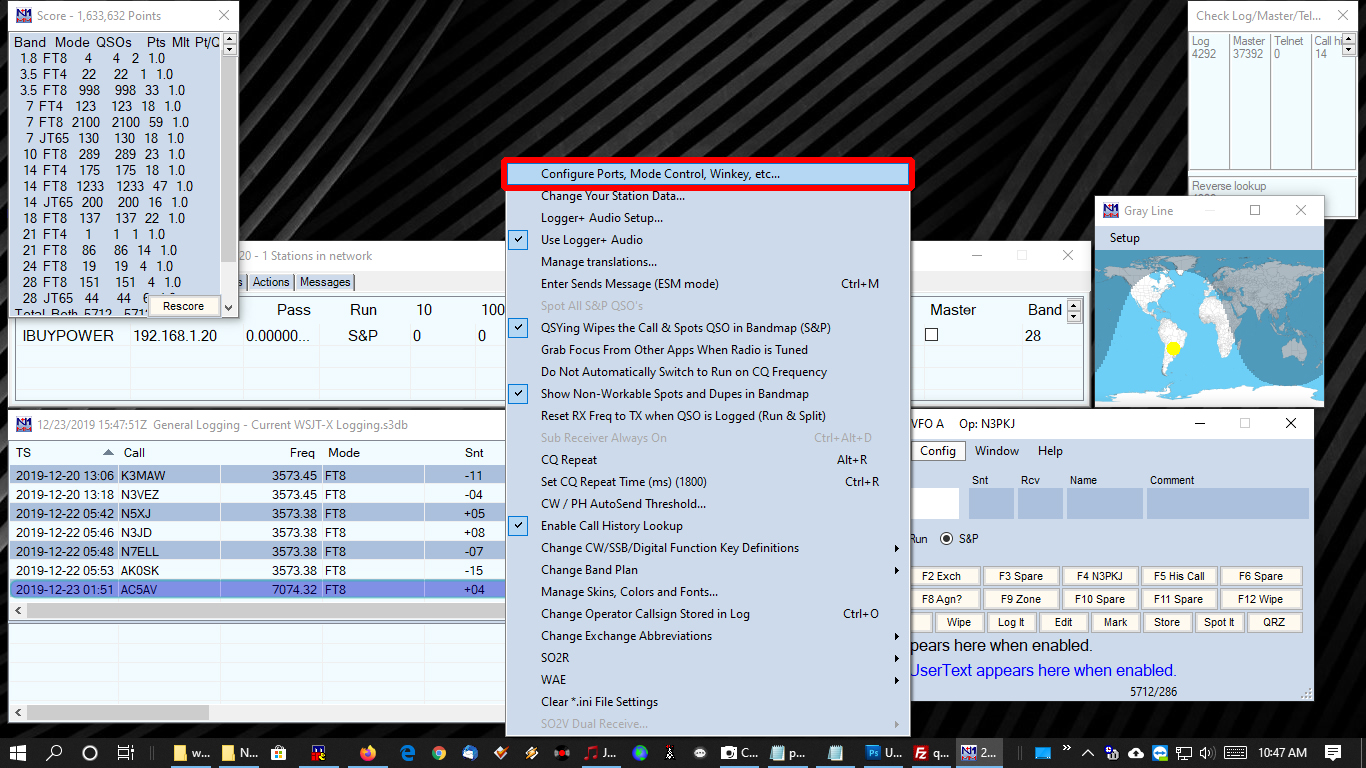
42. Now in the Configurer go to the Hardware tab.
Hardware tab.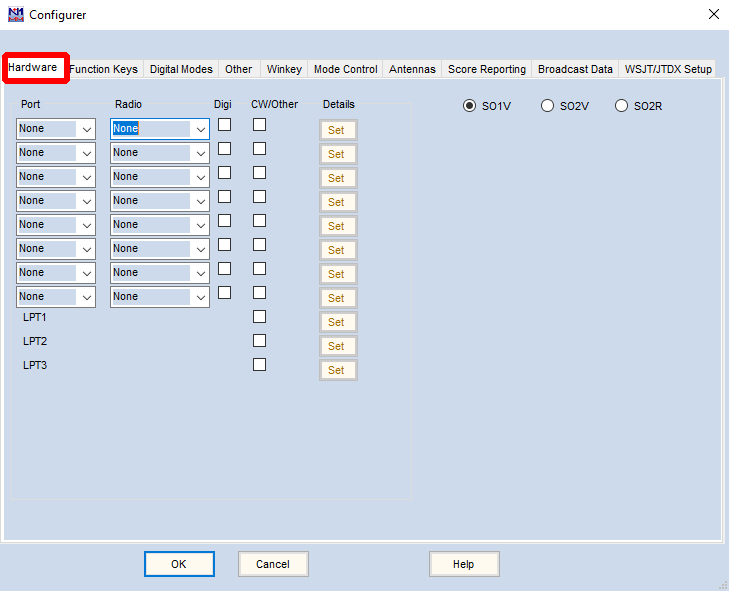
43. Make sure Port all reads “None”
Port.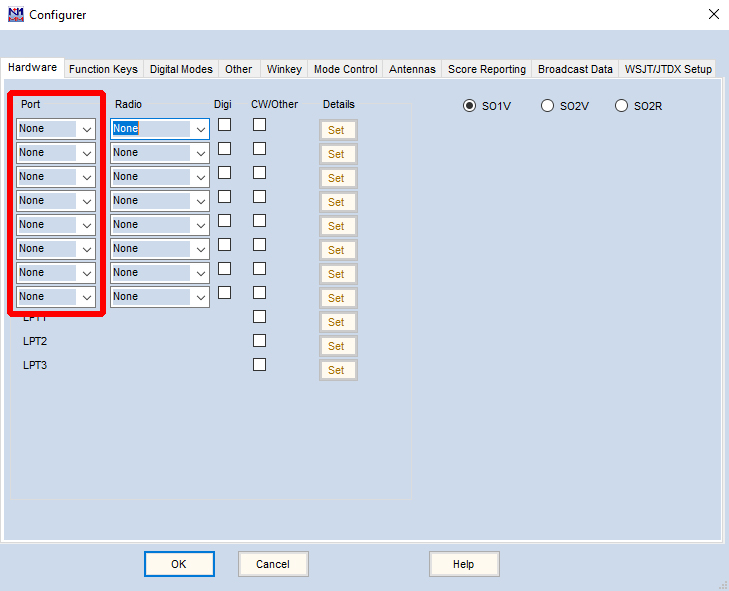
44. Make sure Radio all reads “None”
Radio.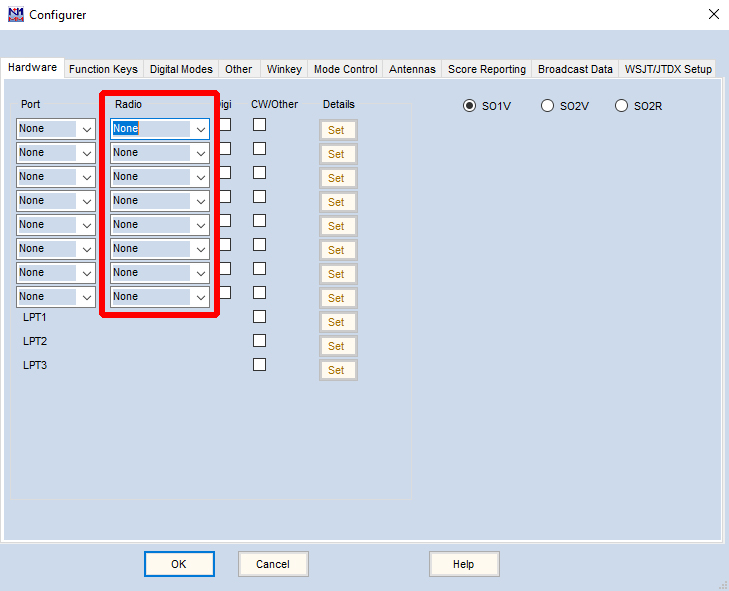
45. Now go to the “Digital Modes” tab and settings should as shown.
Digital Modes tab.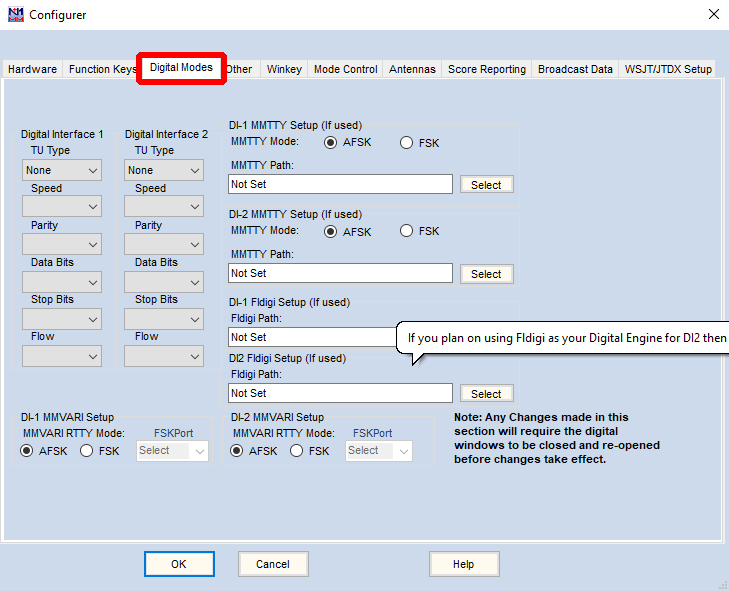
46. Now go to the “WSJT/JTDX Setup” tab. Several things here we need to worry about.
WSJT/JTDX Setup tab.
47. First thing we need to worry about is under “WSJT-X and JTDX UDP Settings”. We need to enable the UDP port.
WSJT-X and JTDX UDP Settings.
48. We need to check the “Enable” box.
Enable box.
49. Next we need to make sure the UDP port number is the same as in JTAlert that we set back at step 15, which is 2333.
UDP port number.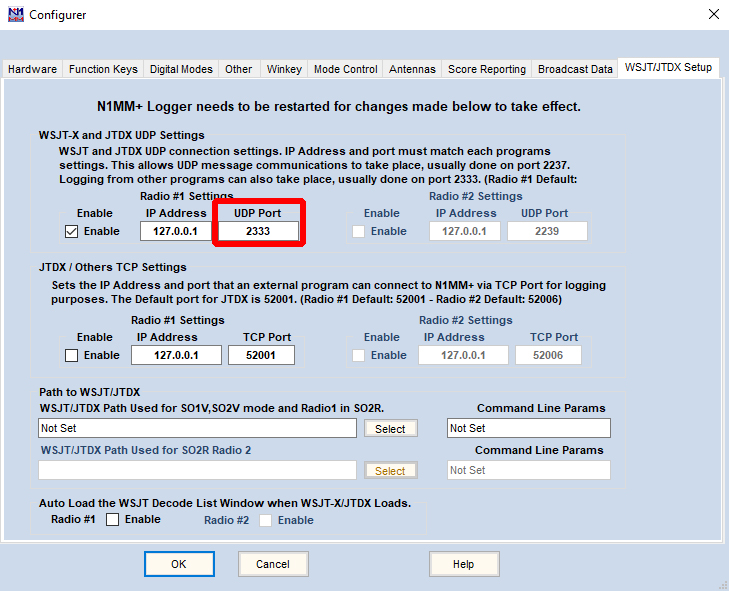
50. DO NOT set the path to WSJT/JTDX. We do not need to do this as for we are not using the Digital Interface in N1MM Logger+.
Path to WSJT/JTDX.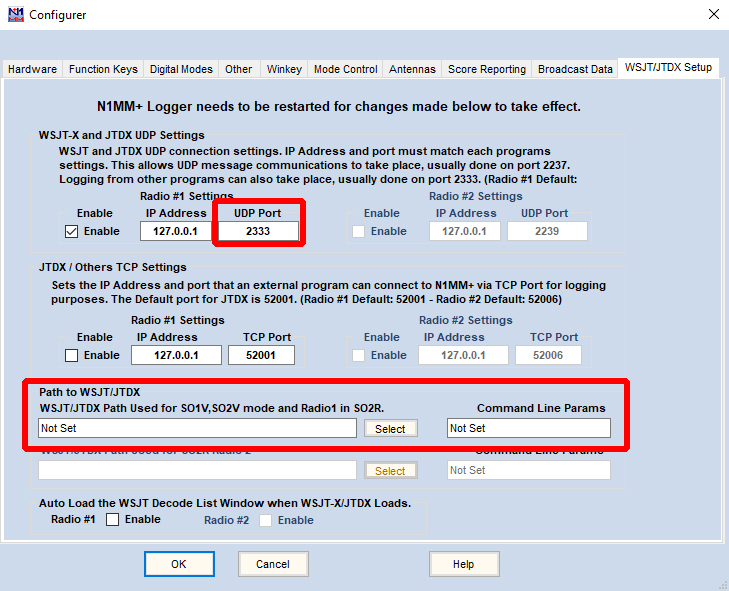
Finally Done!!! Click OK and you should be ready to go!!!!
In the end what will happen when you log a QSO is this WSJT-X will send the information to JTAlert then JTAlert will send the information to N1MM Logger+
- All Asian DX Contest, CW
- SMIRK Contest
- Feld Hell Sprint
- Pajajaran Bogor DX Contest
- SKCC QSO Party
- IARU Region 1 50 MHz Contest
- LZ International 6-Meter Contest
- Stew Perry Topband Challenge
- West Virginia QSO Party
- ARRL Kids Day
- WAB 50 MHz Phone
- Run for the Bacon QRP Contest
- K1USN Slow Speed Test
- ICWC Medium Speed Test
- OK1WC Memorial (MWC)